Kubernetes was launched on June 7, 2014, when Google officially released it as an open-source project. The release of Kubernetes marked a significant milestone in the world of container orchestration, providing developers and organisations with a powerful and scalable platform for managing containerised applications. In this blog, we will try to do a deep dive into Kubernetes architecture and explore its key components .
A Kubernetes cluster consists of two main components:
- Worker node
- Control plane node

Control Plane
The Control Plane is the “brain” of the Kubernetes cluster, coordinating and orchestrating the various components to ensure that the desired state of the system is achieved and maintained. It further consists of:
1. Kube-API server
The API server is the central management point of the control plane that exposes the Kubernetes API, which clients use to interact with the cluster.So when we use kubectl to manage the cluster, at the backend you are actually communicating with the API server through HTTP REST APIs. The kube-api-server is responsible for the following

- API management: Exposes the cluster API endpoint and handles all API requests.
- Authentication (Using client certificates, bearer tokens, and HTTP Basic Authentication) and Authorisation (ABAC and RBAC evaluation)
- Processing API requests and validating data for the API objects like pods, services, etc.
- Communicates with etcd for storing state and configuration.
- API-server coordinates all the processes between the control plane and worker node components.
2. etcd
etcd is a distributed key-value store used by Kubernetes to store the cluster’s configuration data and the desired state of resources. Kube-API-server uses the etcd’s watch functionality to track the change in the state of an object.It is the only statefulset component in the control plane responsisble for the following:

- Serves as the single source of truth for the cluster, ensuring consistency and data persistence.
- Acts as both a backend service discovery and a database.
- Stores all configurations, states, and metadata of Kubernetes objects (pods, secrets, daemon sets, deployments, config maps, stateful sets, etc).
- Stores all objects under the /registry directory key in key-value format. For example, information on a pod named Nginx in the default namespace can be found under /registry/pods/default/nginx
3. Kube-scheduler
The Kube-scheduler is responsible for scheduling pods on worker nodes.When we create a pod and submit it to the API server, the Scheduler automatically picks up the pod, assesses the nodes based on available resources and scheduling rules, and assigns the pod to an appropriate node.
- It determines which nodes are valid placements for each Pod in the scheduling queue according to constraints and available resources.
- The scheduler then ranks each valid Node and binds the Pod to a suitable Node. Multiple different schedulers may be used within a cluster; kube-scheduler is the reference implementation.
- When we deploy a pod, we specify the pod requirements such as CPU, memory, affinity, taints or tolerations, priority, persistent volumes (PV), etc.
- Kubernetes allows users to develop their custom schedulers using the custom scheduler configuration.
4. Kube Controller Manager
The kube-controller-manager is a critical component that runs various controllers responsible for maintaining the desired state of the cluster and managing different aspects of the system.
Each controller focuses on a specific area of cluster management, automating tasks and ensuring that the actual state of resources matches their desired state.

Following is the list of important built-in Kubernetes controllers.
- Node Controller: Responsible for monitoring the state of nodes in the cluster. It detects node failures and initiates actions to replace failed nodes or reschedule pods onto healthy nodes.
- Replication Controller: Ensures that the specified number of replicas of a pod are always running. It creates or terminates pods as needed to maintain the desired replica count.
- Deployment Controller: Builds upon the functionality of the Replication Controller and allows you to declaratively define and manage application deployments. It facilitates rolling updates, rollbacks, and scaling.
- StatefulSet Controller: Manages stateful applications by ensuring stable and ordered scaling and upgrades. It assigns unique network identities to each pod and maintains their identities across rescheduling.
- DaemonSet Controller: Ensures that a copy of a specific pod is running on all or a subset of nodes. It’s often used for tasks like node monitoring agents or networking components.
- Job Controller: Manages batch jobs and ensures that a certain number of completions are achieved for a specified task or job.
- CronJob Controller: Allows you to schedule tasks at specified intervals using a cron-like syntax. It creates jobs based on the defined schedule.
- Namespace Controller: Ensures that each namespace in the cluster has a corresponding set of resources and enforces resource isolation.
- Service Account and Token Controller: Automatically creates default accounts and access tokens for pods in a namespace.
- Service Controller: Monitors services and endpoints and updates them as pods are created, deleted, or rescheduled.
- Endpoint Controller: Maintains endpoint objects that match services to pods based on label selectors.
5. Cloud Controller Manager (CCM)
When Kubernetes is deployed in cloud environments, the cloud controller manager acts as a bridge between Cloud Platform APIs and the Kubernetes cluster. It manages the lifecycle of cloud-specific resources used by kubernetes.

- It offloads cloud-specific control loops and functionalities from the main Kubernetes control plane, reducing its complexity and making it easier to maintain and extend.
- It hosts various cloud-specific controllers responsible for managing resources specific to the cloud provider. These controllers include:
- Node Controller: Manages interactions between Kubernetes nodes and cloud instances, handling node lifecycle operations like creation, deletion, and resizing.
- Route Controller: Handles cloud-specific networking configurations for services, such as creating load balancers or managing IP addresses.
- Volume Controller: Integrates with cloud storage services to provision and manage persistent volumes in a cloud-specific way.
- Service Controller: Interacts with the cloud provider’s load balancer services to create, manage, and update load balancers for Kubernetes services.
- 4 . It communicates with the cloud provider’s APIs to perform actions like creating instances, configuring networking, managing storage resources, and more.
- 5. It ensures that security settings and credentials are appropriately managed when interacting with cloud services.
- 3 . The CCM manages cloud resources to ensure that they match the desired state defined by Kubernetes resources. For instance, it might provision or release cloud instances based on scaling requirements.
Worker Node
The Worker nodes are responsible for running containerised applications. It has the following components.
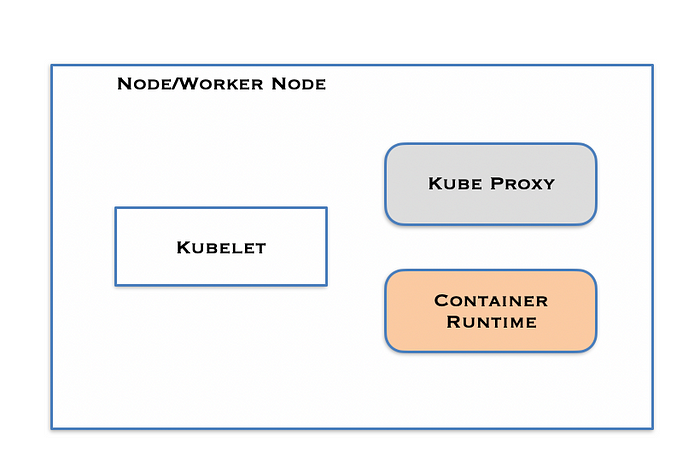
- kubelet
- kube-proxy
- Container runtime
1. Kubelet
Kubelet is a critical bridge between the Kubernetes control plane and the containers running on nodes, making sure that the cluster’s desired state is achieved and maintained.
It runs an agent component that runs on every node in the cluster. It does not run as a container instead runs as a daemon, managed by systemd.

Here are the key functions and responsibilities of the kubelet:
- Node Agent :The kubelet acts as an agent on each node, reporting the node’s status and resource utilization back to the Kubernetes control plane.
- Health Monitoring: The kubelet continuously monitors the health of containers within pods. If a container crashes or becomes unhealthy, the kubelet takes appropriate actions, such as restarting the container or the entire pod.
- Pod Management: Kubelet manages the state of pods on a node. It ensures that the specified pods are running and healthy according to the pod definitions received from the Kubernetes API server.
- Pod Networking :The kubelet works with the network plugins to set up the networking for pods on the node. It assigns IP addresses to pods and ensures that containers can communicate with each other and the external world.
- Volume Management: The kubelet manages volumes specified in pod definitions, attaching and detaching them as necessary. It ensures that data is stored persistently or shared across containers as needed.
- Resource Management: The kubelet enforces resource constraints specified in pod definitions, ensuring that containers do not exceed allocated CPU and memory limits. It also handles requests for resources like CPU and memory.
- Eviction and Cleanup: When resources become scarce on a node, the kubelet can evict pods based on predefined policies to free up resources. It also cleans up any leftover resources when pods are terminated.
- Node Registration: The kubelet registers the node with the Kubernetes control plane, allowing the control plane to be aware of the nodes available for scheduling pods.
2. Kube proxy
Kube Proxy, short for Kubernetes Proxy, is a network proxy that runs on each node in a Kubernetes cluster. Its primary function is to manage network communication between pods and services within the cluster, providing a reliable and consistent networking environment for containerized applications. Its responsible for the below:
- Service Discovery : Kube Proxy is responsible for enabling service discovery within the cluster. It maintains network rules to forward requests from services to the appropriate pods based on labels and selectors defined in the service specifications.
- Load Balancing : Kube Proxy implements load balancing for services with multiple replicas or instances. It distributes incoming requests across the available pods that match the service’s selector criteria.
- Network Address Translation (NAT) : Kube Proxy performs Network Address Translation (NAT) for outgoing traffic from pods. This ensures that traffic from pods appears to originate from the host’s IP address, allowing external systems to respond back correctly.
- ClusterIP Services : For ClusterIP services (which are only accessible within the cluster), Kube Proxy sets up IPTables rules to forward traffic to the correct pods based on their labels.
- NodePort Services : Kube Proxy configures the host’s firewall to forward incoming traffic to the NodePort service to the appropriate pods. This enables external access to services using a static port on each node.
- High Availability : Kube Proxy works to ensure high availability of services. If a pod becomes unavailable or is added/removed, Kube Proxy automatically updates the network configuration to route traffic correctly.
- Health Checks : Kube Proxy monitors the health of endpoints and pods associated with services. If a pod becomes unhealthy, Kube Proxy stops forwarding traffic to it.
3. Container Runtime
Like Java Runtime Environment(JRE) is the software required to run Java programs on a host. In the same way, container runtime is a software component that is required to run containers.
Some popular container runtimes used in Kubernetes include: Docker, containerd , CRI-O, rkt (pronounced “rocket”) etc.
- Container Management: The container runtime environment is responsible for creating, starting, stopping, and managing containers based on the pod specifications provided by the Kubernetes control plane.
- Image Management: It pulls container images from container registries like Docker Hub, Google Container Registry, etc., based on the image references specified in pod definitions.
- Resource Isolation and Management: The runtime environment ensures that containers have the appropriate levels of CPU, memory, and other resources as specified in their pod configurations.
- Networking and Communication: It sets up networking for containers, ensuring they can communicate with each other and with services inside and outside the cluster. It might involve configuring network namespaces, IP addresses, and port mappings.
- Container Security: The runtime environment enforces isolation between containers, preventing them from accessing each other’s file systems or resources. It might also implement additional security measures such as AppArmor or SELinux.
- Volume and Storage Management: The runtime environment manages volumes attached to containers, ensuring data persistence and allowing containers to access shared storage.
- Lifecycle Management: It handles the complete lifecycle of containers, including starting, stopping, restarting, and cleaning up containers as necessary.
- Health Monitoring and Restart: The runtime environment monitors the health of containers and can automatically restart containers that have crashed or become unhealthy.
- Interaction with Hardware and Kernel: The runtime interacts with the host operating system’s kernel and manages container resource usage, network namespaces, process isolation, and other low-level operations.
Kubernetes’ architecture promotes a distributed microservices-oriented approach, enabling developers to focus on application logic while the platform handles deployment, scaling, and load balancing.
Whether on-premises, in the cloud, or in hybrid environments, Kubernetes’ architecture empowers organizations to manage complex containerized workloads efficiently, while embracing the principles of modularity, abstraction, and automation.